Risk Management in Bassoon Reed Making: Three Examples
By James B. Kopp
James Kopp & Associates
- Example 2: Cutting the collar on a bassoon reed
- Example 3: Narrowing the tip of a reed shape
- Discussion
For most double-reed players, the term “risk management”
conjures up thoughts of insurance policies, or investment strategies
– topics seemingly remote from our musical agendas. Yet it can
be useful to think of reed making in analogous terms. Who among us would
not like a little insurance policy on each reed, or a strategy for reed
making intended to maximize our “return on investment” of
time, materials, and effort? Especially when the cost for this insurance
is little or nothing?
“But I’m not a financial type,” you
say. “I don’t like hearing about insurance policies,”
you protest. Well, I’m with you. But far outside the fields of
insurance and investments, a wide variety of manufacturers adopted strategies
of risk management long ago. Time, tools, materials, and effort are
managed on a daily basis, with a goal of controlling both expenditures
and product quality. Take, for example, the machinist, a worker whose
craft clearly parallels ours as reed makers. A machinist, or machine
tool operator, crafts items, often small and moving ones, over and over,
just as we do. The objects may be metal parts for automobiles, or wooden
rungs for ladders or chairs, or gemstones for jewelry. The machine tool
may be power-driven or not, but it will have certain advantages over
hand tools (which we will discuss below).
Thus a machinist may sometimes be called an auto worker,
a millwright, or a lapidary, even though the tasks undertaken are closely
analogous to one another. In fact, some of us reed makers use gouging
or profiling machines, which are themselves machine tools. So we are
sometimes machinists ourselves. But few of us have intensive or systematic
training in this broad field. So it is instructive to examine some of
the steps the machinist takes to avoid waste and variation. Many of
the same principles can be borrowed or adapted, at little or no cost,
by the reed maker who works only with hand tools.
Let’s start with a simple, general example, and
then move on to more specific examples. I don’t claim that any
of the following techniques is the only possible way to complete the
task successfully. But each technique works reliably, and can serve
as a useful illustration of the risk management process at work.
[Top]
Example
1: Holding the workpiece (the reed, that is)
Before the invention (or adoption) of the plaque (perhaps
first seen in Brod’s oboe method of ca. 1826), the reed maker
held the reed in the palm of his hand for knife work. The tip rested
against the fleshy heel of the palm, while the butt was held between
the thumb and index finger. (Much of the slicing or scraping was done
before the tip was opened.) (See fig. 1)
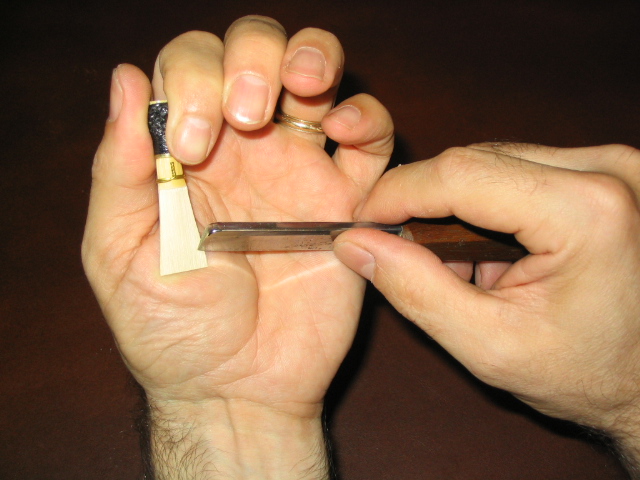
Fig. 1. Before the plaque came into use, the reed maker often held the tip of the reed against the flesh of the palm for working.
Once the plaque came into use, each reed blade was supported
from within, providing a flat surface and a measure of safety to the
reed scraper. Now the mandrel (in earlier times used only in the forming
operation) could also be used to steady the reed during the scraping
operation. (See fig. 2) All these factors made for a safer and more
effective scraping operation.
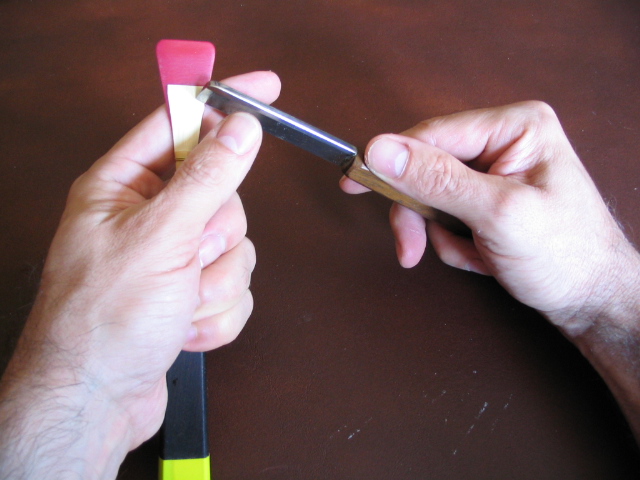
Fig. 2. The plaque provides support under the reed’s blades, lessening the risk of crushing them while working. The mandrel provides a steady grip for the reed maker.
Some reed makers improve on this standard method of holding
the reed by simply resting the holding hand against the desk or the
maker’s thigh. Either one of these improved postures stabilizes
the reed/plaque/mandrel, making errors incrementally less likely and
greatly reducing fatigue in the player’s holding arm. (Aside from
reducing risk to the reed, this improved arm posture also reduces the
risk of tendinitis, a common complaint of both wind players and reed
makers).
A machinist would try to avoid holding the workpiece (as
any material undergoing work, or machine-tooling, is called) in the
unsupported hand. The machinist might instead use some sort of support
for the workpiece; it might be called a clamp, a jig, or a rest, depending
on the nature of the support and the jargon within the machinist’s
special field. We can approximate the machinist’s technique by
simply clamping the holding mandrel in a small vise. The vise can be
mounted to the reed maker’s desk permanently, or on a wooden block
that is large enough to provide stability, yet light enough to be portable.
(See fig. 3) Some vises intended for temporary mounting have a built-in
screw for quick installation and removal. Many such vises, unfortunately,
are not immediately suitable for the typical reed desk because their
jaws run parallel to the desk edge, thus positioning the mandrel at
an awkward angle to the reed maker.
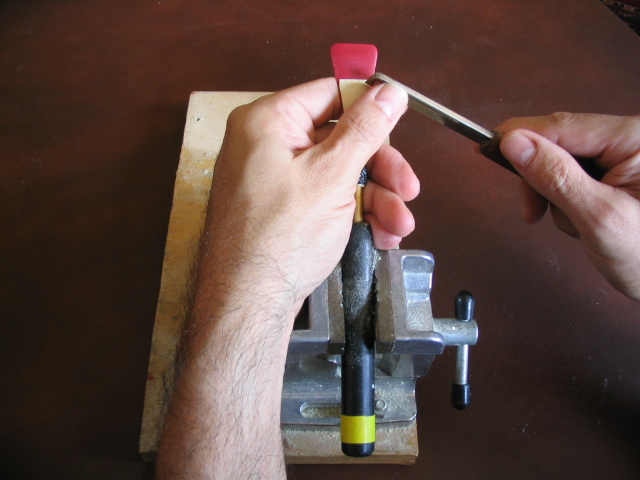
Fig. 3. The holding mandrel can be held by a small vise, which can itself be mounted on a stable but moveable block.
A small vise will cost as much as a large pizza, and the
mandrel handle may eventually become worn by the teeth of the vise jaws,
but there is no other downside to this technique. And it has surprising
advantages. The off hand (the left, for right-handed reed makers) is
suddenly freed up, so that reed work is less fatiguing. In fact, the
off hand can be put to work in ways that reduce fatigue on the “good”
hand. It can steady the knife or file (more about this later), and it
can easily learn to use sandpaper. Scraping with the off hand is a tall
order and one I’ve never mastered, but someone more ambidextrous
than me will succeed in doing so.
Risk: The workpiece (reed) may slip, leading to mis-scraping.
Management: Rest the holding hand against desk or thigh.
Risk: Overuse of the holding hand may lead to fatigue or tendinitis.
Management: Clamp the holding mandrel in a vise.
Our next example demonstrates some of the criteria used in choosing the optimum tool for a task.
Example 2: Cutting the
collar on a bassoon reed
The collar of a bassoon reed, if present, is an unremoved bit of rind
(or “bark” or epidermis) that projects above the first wire.
(Some styles of bassoon reed do not employ a collar.) If a noticeable
“step” between the collar and the blade surface of the reed
is desired, the task of creating the step can be time-consuming or risky,
or both. Some players are reluctant even to attempt the creation of
a collar and step, because they’re afraid of botching the job.
This is a missed opportunity, because the step can have a noticeable
effect on the reed’s sound and response.
Once again, the machinist has a technique that we can borrow. It is
common for machine tools to have a “guide” of some sort,
a means of directing the travel of the tool. The guide minimizes risk
by preventing the tool from going where it is not intended to go. The
bassoon reed maker can easily approximate the function of a machinist’s
guide by using the thumb of the off hand. (To avoid ambiguity, I’m
going to use compass directions to refer to the necessary motions; “north”
is upward, “east” is rightward, etc. “Inward,”
however, means into the workpiece, and usually away from the reed maker.)
Either a single-edge razor blade or a fine-edge knife (double hollow-ground, for example) is sharp enough to score the rind (that is, to make an inward cut to about the desired depth). In one sense, the knife is preferable in that the length of its handle serves as a visual aid while the maker attempts to cut exactly parallel to the nearby first wire. That is, the length helps the maker avoid a “yawing” error. In either case, you, the maker, can use the thumb of the off hand as a guide: simply position the off thumb approximately on top of the first wire, adjusting the placement so that the extremity of the nail or flesh is touching the imaginary line you wish to score. (See fig. 4)
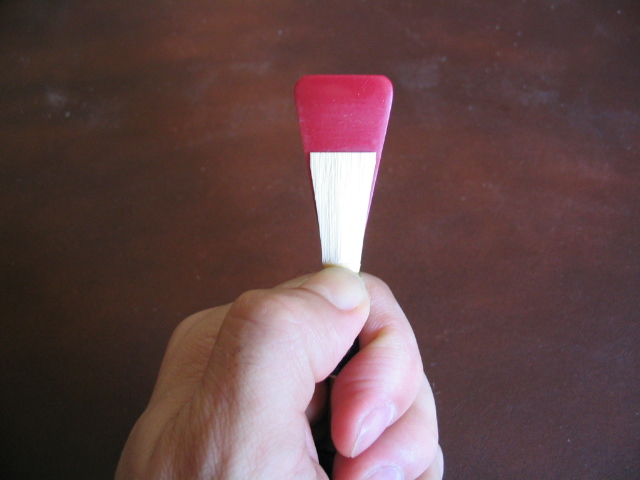
Fig. 4. The thumb nail of the off hand is positioned touching the line where the collar step will be created.
Then bring the blade lightly into contact with the rind of the reed.
Next, rock the blade back and forth slowly on the line, using the thumb
as guide to prevent slippage, and applying inward pressure until you
feel the desired depth has been reached. (See fig. 5)
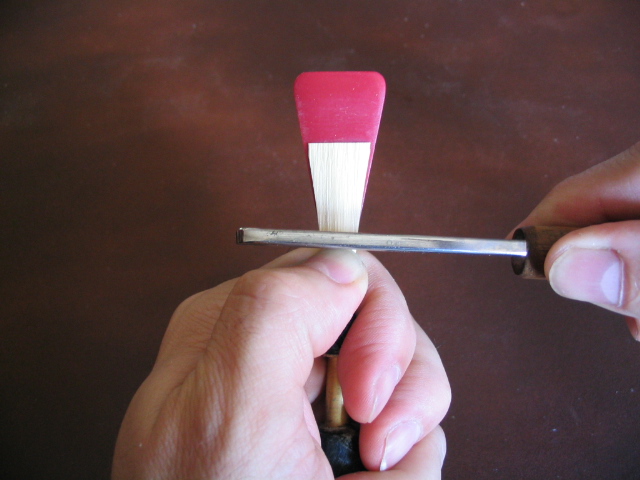
Fig. 5. A thin knife is steadied against the thumb nail, making an accurate scoring cut more likely.
The next step is to cut southward (that is, back toward the scored line), to remove the excess cane (the “chip,” as the machinist would call it). One risk here is that the blade, being very sharp, will travel further than the maker wishes – past the scored line. It’s a good time to use a blunter knife, such as a single-bevel knife. Even if such a knife is properly sharpened, it is designed as a less acute wedge; this blunter wedge will be sharp enough to make the cut, and yet it will be easier to control. The maker can increase the control still further by bracing the thumb of the good hand against the thumb of the off hand, which is wrapped securely around the mandrel. (See fig. 6) The biomechanical result of this is that the motion is necessarily transferred away from the shoulder and elbow, and to the palm and wrist muscles, which are much better trained in fine motor movements.
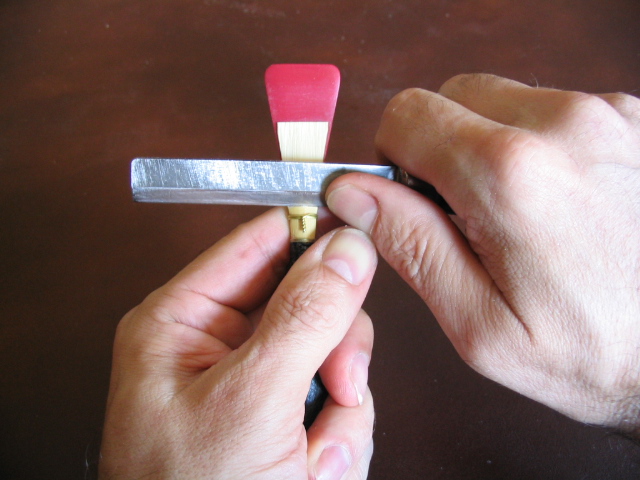
Fig. 6. The reed maker uses a single-bevel knife to
remove the chip. When cutting in this direction, the thumb of the knife
hand is braced by the thumb of the other hand, which is itself steadied
by a grip on the holding mandrel.
In the third step, the maker uses a blade (preferably
the single-bevel knife, which is less likely to travel too deeply) to
cut inward again at the scoring line. This is done several times along
the line, until most of the chip has been removed.
The final task is to use a file to clean up the step, leaving it smooth,
clean, and right-angled. A good tool for this task is an extra-narrow
pillar file, so called because it can be used to create a pillar (a
rectangular solid that rises up out of the main body of a workpiece).
A pillar file has two desirable characteristics for this sort of task:
it has a straight body (which, properly used, will preserve the straight
line you created by scoring and chip removal) and “safe”
edges on the non-cutting sides of the file. (If your file has a safe
edge, you’ll be filing only inward; without a safe edge, you’ll
be filing both inward and southward, thereby disturbing the line you
scored and chipped out.) In addition, a longer file makes any yawing
more obvious to the eye, thereby reducing the likelihood of error. (See.
fig. 7)
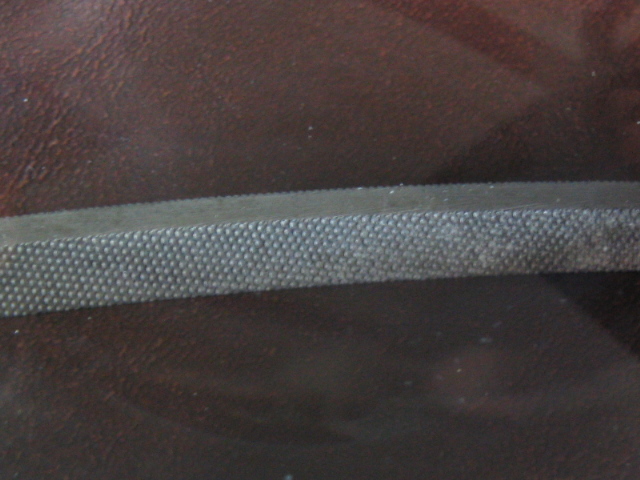
Fig. 7. This extra-narrow pillar file, useful for cleaning
out the collar step, has both a cutting surface (shown below) and a
safe surface (shown above).
The risk analysis and management of this operation is a little more detailed than the previous example:
Risk: The scoring blade will yaw, creating a slanted line for the collar.
Management: Use the thumb of the off hand as a guide for the blade. Observe the knife handle, which protracts any yaw error, making it more obvious.
Risk: The blade will travel too far “south,” undercutting the collar.
Management: Use a blunter-shaped knife for southward cutting, such as a single-bevel knife. Brace the cutting hand against the off hand, increasing control of the tool.
Risk: A tapered file will create a curved collar line.
Management: Use a straight file.
Risk: The file will cut “south” into the scored collar line.
Management: Use a file with a safe “south” edge.
Our next example illustrates how machinists break down a complex task
into a series of smaller, simpler tasks.
[Top]
Example 3: Narrowing
the tip of a reed shape
We are fortunate, in modern times, to have many shapers (or templates,
as a machinist would call them) available, some one of which will usually
yield a reed of the desired proportions. But occasions sometimes arise
when the tip of a reed’s blades is wider than we wish. Attempting
to narrow it can be treacherous, as many of us can attest from personal
experience. Let us consider how a machinist would approach this task.
(Let’s focus here on creating straight rails or sides –
curved rails are much riskier.)
One reason the narrowing operation is treacherous is because the reed’s material – the cane – has a strong lengthwise grain. When we wish to create a narrower tip, we are attempting to create a diagonal line across the grain, which is a risky proposition. The machinist, knowing this, might begin by turning the grain direction to his advantage. The first step is to hold the reed on a mandrel, with the tip pointing toward your chest. Then select the point on the rail “due north” of the desired new tip width. Then, using a sharp blade, slice along the grain, toward your chest. (See fig. 8) This is a fairly safe and predictable operation, because the natural tendency of the cane is to “rip,” or split along its grain.
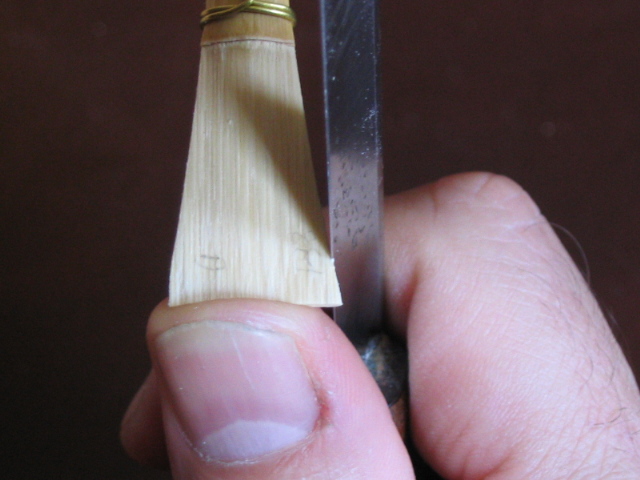
Fig. 8. In narrowing a reed tip, the maker uses a thin
knife blade to “rip” along the grain.
The resulting shape has a convex corner. (See fig. 9)
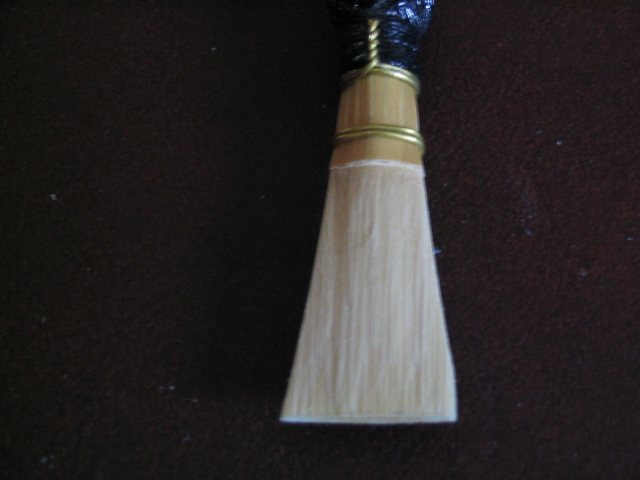
Fig. 9. After ripping, the resulting shape has a small convex corner (right) that must be filed away.
We want to remove this corner by using a file. This is
a good time to choose a large file. The wider the file, the less chance
there is of filing too deeply into the rail (in the east or west dimension),
because the large file spans all of the convexity (the portion to be
removed). It’s simply a matter of choosing the right angle of
address, and then filing until the convexity is gone. Otherwise, with
a narrow file, the maker is forced to work one part of the convexity,
then another, then return to the first part, etc., all the while relying
on his visual impression to avoid excessive filing. In this instance,
using the larger tool makes for a simple (and speedy) operation, while
using a smaller tool would make for a complex (and thus riskier) operation.
One other effective technique is to grip the reed blades from top and bottom near the convexity, pinching the two blades firmly shut while filing. (See fig. 10)
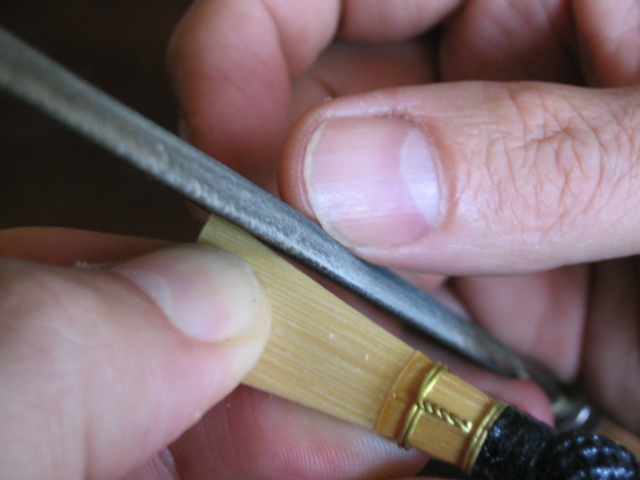
Fig. 10. While filing away the convexity, the reed maker grips both reed blades, pinching them securely shut so that the file does not tear them.
This lends stability to the workpiece (the reed), lessening
the chance that one blade will be flexed open and damaged by the file.
Risk: Pronounced grain direction will interfere with the diagonal cane removal.
Management: Make the first cut along the grain.
Risk: Use of a too-small file may lead to excessive filing and unwanted concavity.
Management: Use a file large enough to remove the entire convexity in one operation.
Risk: The file may flex a reed blade outward, risking tearing or breaking.
Management: Pinch the blades together, holding them near the convexity.
[Top]
Theorists of workmanship distinguish between “workmanship of risk” and “workmanship of certainty.” (See, for example, David Pye, The Nature and Art of Workmanship, rev. ed. (Bethel, Connecticut: Cambium Press, 1968), 20-24.) In the first category, more skill and judgment are demanded of the worker, because there is a large possibility of disastrous error. In the second category, less skill and judgment are demanded, because the work techniques have been designed to minimize risk. We may imagine a continuous scale of risk/certainty, with different tasks falling at various points along the scale. (See fig. 11)
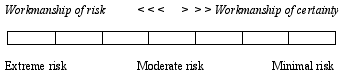
Fig. 11. Some reed making tasks have a high risk of disastrous error, while others have little or none. They may be ranked along a scale between these two extremes. (After David Pye, The Nature and Art of Workmanship.)
Each of the management techniques suggested above is designed to lower
the risk inherent in the task described – to move it further to
the right on the scale. We haven’t spoken here of doing away with
risk altogether, because that it often impossible for hand work. Instead,
we speak of risk management, because we are simply improving our chances
of success a little by borrowing some techniques from our colleagues
the machinists.
The most valuable insight we can gain from this discussion is not any
one suggested technique. Instead, it’s a new attitude (new to
most of us non-machinists, at least) toward reed-making tasks, in which
we automatically ask, “What could go wrong here, when I attempt
to ....” And we finish the sentence by naming any reed-making
task that we face, old or new. In other words, we analyze the operation
by identifying the potential risks. Then we attempt to imagine a technique
that will minimize the risk of the task. In other words, we begin to
manage the risk.
Far from making a neurotic doubter out of the reed maker, habitual
risk management has a liberating effect: the maker is less afraid to
attempt new or delicate operations, because the various risks can always
be managed, if not always eliminated.
This approach to reed work courts success by simplifying all the component
tasks. If you can break down the work into a series of “no-brainer”
tasks, then you’ve gained a major advantage in reed making. This
is particularly important in an endeavor where a tenth of a millimeter
(or a hundredth of an inch) can make a critical difference in the product
quality – in the performance characteristics of the reed.
We haven’t said anything here about reed design, only about manufacturing
techniques. But the reed maker who can routinely turn out reeds with
a high degree of consistency can then – and only then –
make controlled experiments with design variations. The differences
heard and felt in the new reed design will be attributable to the reed
design itself, not to accidents in the execution of the design. In other
words, you can take much of the bad luck out of the reed making process
by this systematic dumbing-down of tasks. And what could be smarter?
I’m grateful to Frank A. Morelli and Leslie Ross, who read
this article in draft and made numerous useful suggestions.
Text and figures copyright 2004 by James B. Kopp
James B. Kopp has been a commercial reed maker (and teacher of reed making and adjustment techniques) since 1991, specializing in reeds for bassoon, contrabassoon, and early bassoon.